Your first release
Deploy to Kubernetes without knowing Kubernetes.
Describe your application with Docker Compose, run it on your machine, and push. The platform deploys it to staging. When you are happy with it, promote that release to production.
This walkthrough uses a small web application. You will configure its two environments, publish your first release, and open it in your browser.
Compose template preview
This walkthrough describes the target Compose workflow. Integration into the published
project template is still in progress; that template currently uses the earlier deploy/ flow.
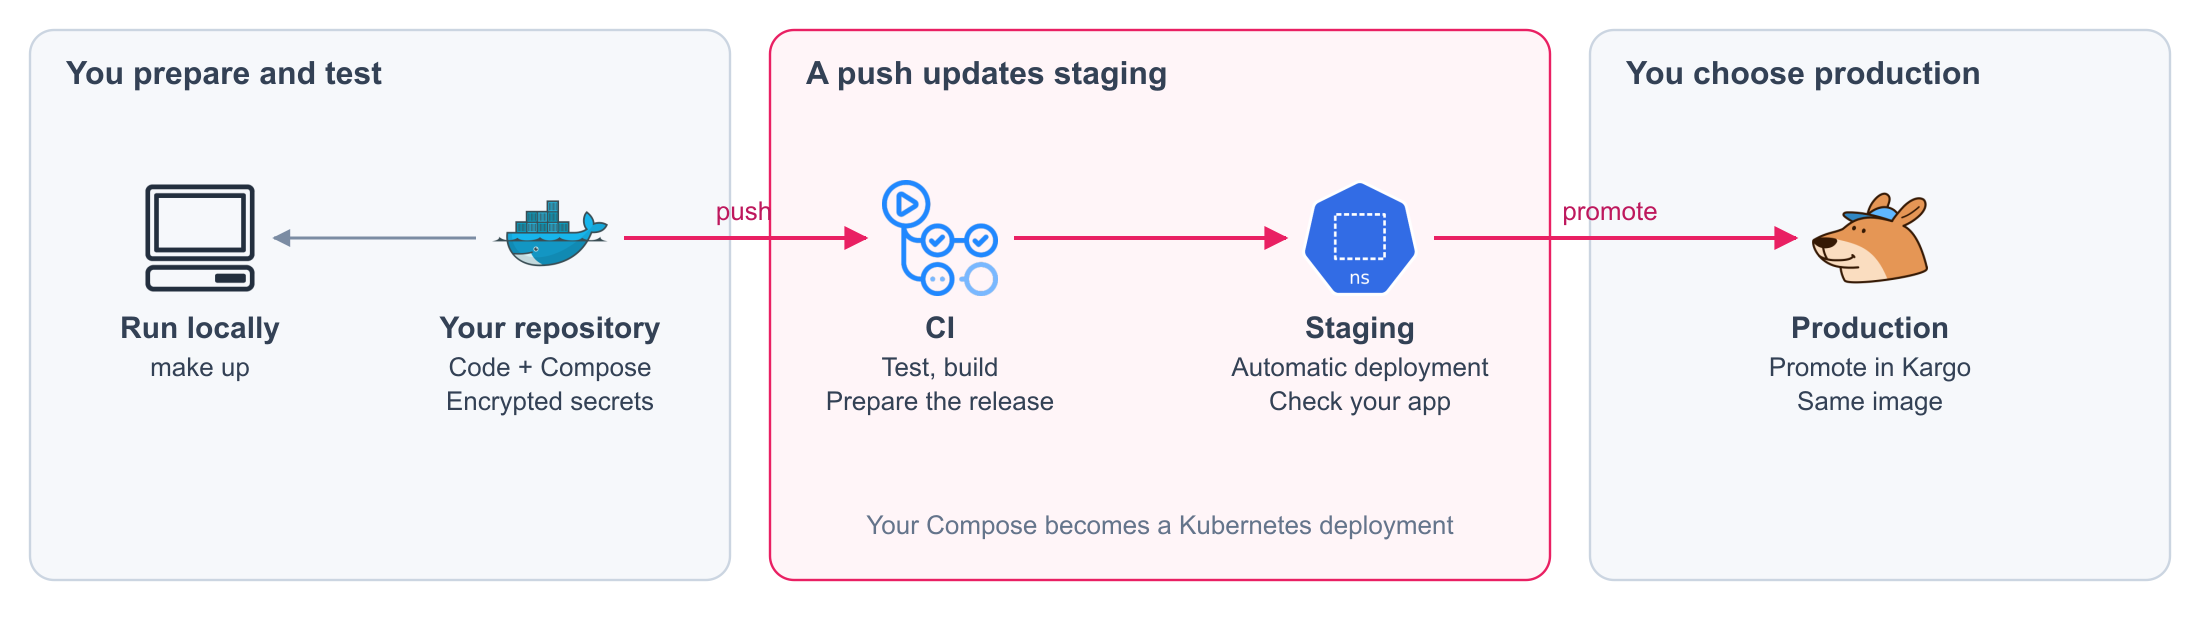
Before you start
You need Git, GitHub CLI (gh), Docker with Compose, Make, SOPS, and age on your machine.
Sign in to GitHub with gh auth login.
Your platform team provides:
- A GitHub organization and project template. The platform's GitHub Apps and CI runners must have access to your new repository.
- An image repository and credentials. This guide uses Docker Hub. CI needs permission to publish; the platform also needs permission to read private images for promotion and deployment.
- Two application hostnames and dashboard URLs. One hostname for staging, one for production, plus access to the release dashboard, Kargo.
The examples use blackstorm-dev/my-app, Docker Hub namespace <your-namespace>, and hostnames
under example.com. Replace them with your team's values. You do not need to create a cluster
or install Kubernetes on your laptop.
1. Create your application repository
Create your own repository from the template, then initialize it:
gh repo create blackstorm-dev/my-app --private \
  --template blackstorm-dev/project-template --clone
cd my-app
make init
make init sets up secret encryption and the checks that keep credentials out of your commits.
It also gives your repository's CI the key it needs to read encrypted files. Keep the generated
age.key out of Git and back it up securely.
For this walkthrough, keep the sample application and its Dockerfile. The application listens on
port 8080, displays MESSAGE at /, and returns ok at /healthz.
These are the files you will work with:
my-app/
├── app.py
├── Dockerfile
├── docker/
│   ├── compose.yaml              # services shared by all environments
│   ├── compose.dev.yaml          # local build and access from your laptop
│   ├── compose.staging.yaml      # staging settings and hostname
│   └── compose.production.yaml   # production settings and hostname
├── secrets/
│   └── dockerhub.env             # encrypted credentials for publishing
└── Makefile
The template supplies CI and the commands around Compose. You describe the application; the platform generates its Kubernetes manifests.
2. Run it on your machine
The base Compose describes the service. WEB_IMAGE lets CI supply a release image; locally it
falls back to my-app:dev.
name: my-app
services:
  web:
    image: ${WEB_IMAGE:-my-app:dev}
    environment:
      PORT: "8080"
The development file adds a build from your Dockerfile and publishes the container's port on localhost:8000:
services:
  web:
    build:
      context: ..
      dockerfile: Dockerfile
    ports:
      - "127.0.0.1:8000:8080"
    environment:
      MESSAGE: Hello from development
make up
curl --fail http://127.0.0.1:8000/
curl --fail http://127.0.0.1:8000/healthz
make up combines the base and development files, builds the image, and starts the application
with Docker Compose. The two requests should return Hello from development and ok.
3. Give staging and production their settings
Each environment combines the base plus its own file. The development file is not included in a deployment.
name: my-app-staging
services:
  web:
    image: ${WEB_IMAGE:?Set WEB_IMAGE to the release image}
    environment:
      MESSAGE: Hello from staging
    ports:
      - "8080"
    x-ingress:
      routes:
        - hostname: my-app-staging.example.com
          port: 8080
name: my-app-production
services:
  web:
    image: ${WEB_IMAGE:?Set WEB_IMAGE to the release image}
    environment:
      MESSAGE: Hello from production
    ports:
      - "8080"
    x-ingress:
      routes:
        - hostname: my-app.example.com
          port: 8080
Replace the hostnames with those assigned to your application. x-ingress tells the platform
which hostname reaches which container port. The platform handles the gateway and HTTPS;
the sample still listens for HTTP on port 8080 inside the cluster.
You do not update WEB_IMAGE by hand for each release. CI supplies the immutable image reference
when preparing the deployment. Promotion keeps that image and uses the target environment's
settings: production displays its own message, even though it runs the same application image.
4. Give CI permission to publish
Set the Docker Hub namespace: the account or organization that owns the image repository,
without /my-app.
gh variable set DOCKERHUB_NAMESPACE --body '<your-namespace>'
make secrets FILE=secrets/dockerhub.env
The second command opens your editor. Enter the credentials you received:
DOCKERHUB_USERNAME=your-dockerhub-user
DOCKERHUB_TOKEN=your-dockerhub-token
Save and close. SOPS encrypts the file; commit that encrypted version. CI uses the key configured
by make init to read it. The private image repository must already exist as
<your-namespace>/my-app.
These credentials publish the image. Confirm that the platform's read access is also ready; a successful push to Docker Hub does not prove the cluster can download a private image.
The sample needs no application secrets. When your application does, declare encrypted files
using Compose secrets: see Use a secret in your application.
5. Push and follow the release to staging
Enable discovery once, then publish your changes:
gh repo edit --add-topic blackstorm-deploy
git diff
# Review the changed files, including the encrypted credentials.
git add docker/ .sops.yaml secrets/dockerhub.env
git diff --cached
git commit -m "Configure my first release"
git push origin main
The topic makes your repository discoverable by the platform.
There are two places to follow your release:
| Open | What happens | What confirms this step |
|---|---|---|
| Your repository → Actions | CI checks the application, publishes its image, and prepares each environment | The release workflow succeeds |
| Your project in Kargo | The platform picks up that release and deploys it to staging | The staging promotion succeeds |
A green CI run means the release is ready to deploy. Wait for staging's promotion and deployment to finish, then open your staging hostname:
curl --fail https://my-app-staging.example.com/
curl --fail https://my-app-staging.example.com/healthz
You should see Hello from staging and ok. Production has not been promoted yet.
For a platform running locally, use the assigned .localhost hostname and port 8443 instead
of the example URLs. If its certificate is not trusted on your machine, use curl -k for that
local check only.
6. Promote that release to production
Once you have checked the application in staging:
- Open your project in Kargo.
- On the production stage, choose Promote. Start from production, not staging.
- Select the release that successfully deployed to staging, then confirm Promote.
- Wait for the production promotion to succeed, then check your application.
Open your production hostname:
curl --fail https://my-app.example.com/
curl --fail https://my-app.example.com/healthz
You should see Hello from production and ok. Production now runs the same image you tested
in staging. Promotion did not rebuild it.
Your next change
Change the code or Compose configuration, review the diff, and push to main. CI prepares another
release and staging updates automatically. Production stays on its current release until you
promote another one.
To return to an earlier release, select it from production → Promote in Kargo. Rollback restores that release's code and configuration; it does not undo database changes or restore uploaded files.
If the release gets stuck
| What you see | Where to look next |
|---|---|
| No workflow, or a job stays queued | Check the repository's Actions settings and its access to the platform runners |
| CI cannot decrypt or publish | Check SOPS_AGE_KEY, secrets/dockerhub.env, the namespace variable, and the image repository permissions |
| CI succeeds but the project never appears | Check the blackstorm-deploy topic and the GitOps GitHub App's access to this repository |
| Staging's promotion fails | Open that promotion in Kargo and read the failing step |
| A promotion reports a deployment failure | Follow its link to Argo CD for deployment details, or share the failed promotion with your platform team |
| The app is healthy but its URL does not work | Check the hostname and container port in x-ingress against the URL you are opening |
Add application secrets, scheduled jobs, resource requests, and observability as your application needs them.